You can create a photo album in PowerPoint for your beautiful and favourite photo collections and present it to your loved ones.
Not only that, but you can also present your photos related project meaningfully and beautifully to those who need it. To do so, follow the steps below.
Table of Contents
Steps to create a Photo Album:
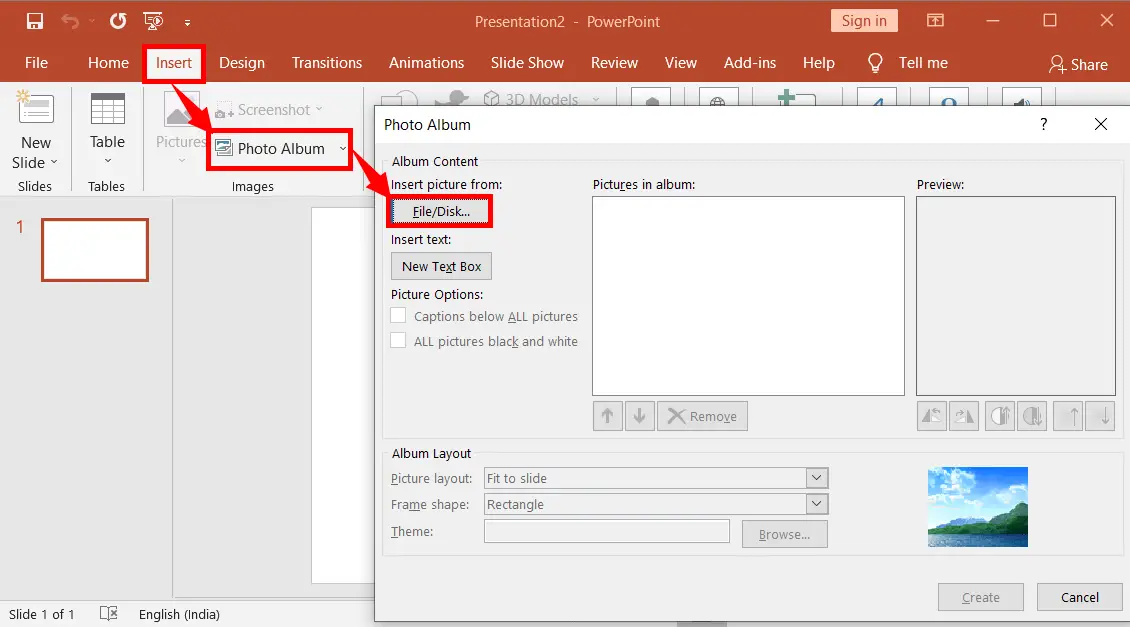
Go to the Insert Tab
Click on the Photo Album in the images group to open a dialogue box
In the Photo Album dialogue box, click File/Disk to open a photo location to insert it
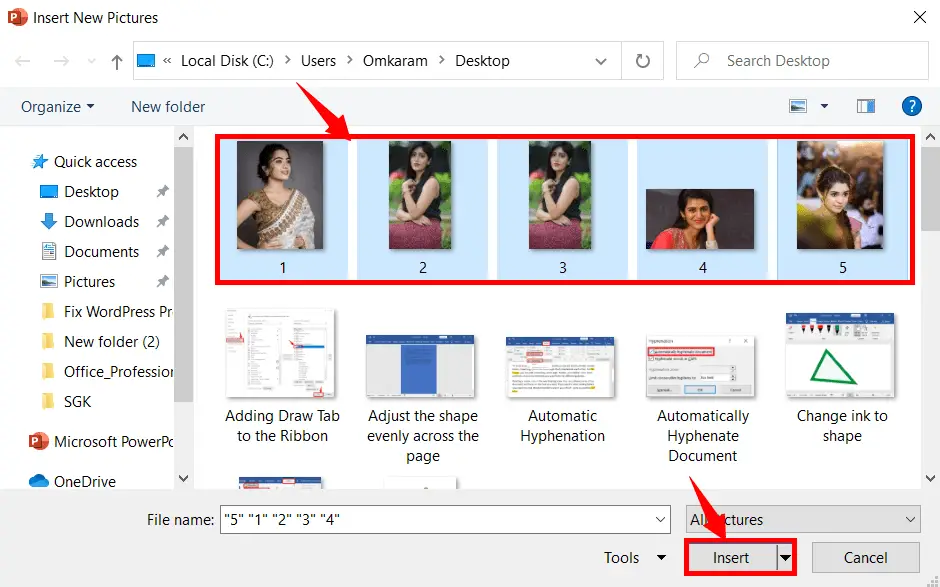
Search, select and insert photos you like
Click the picture album list one by one to see the previews of the images to the right
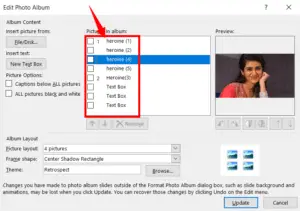
Tick mark any picture in the list to activate its customizing options such as moving up and down, removing, rotating, brightness, and contrasting a picture.
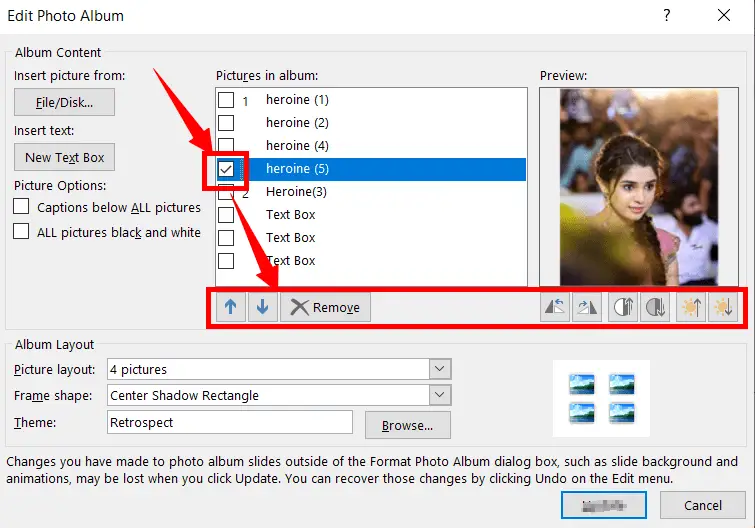
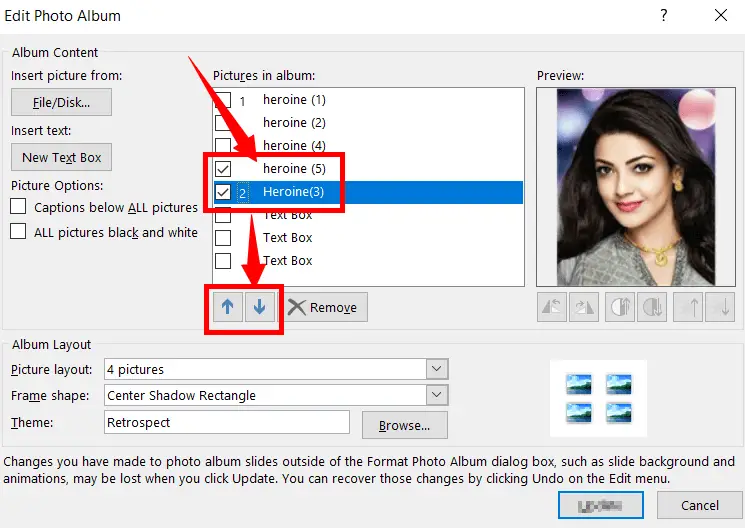
To move a picture up or down click the up or down arrow after tick marking the check box of any picture
To remove any picture from the list, ticks mark the check box of the related picture, then click “Remove”

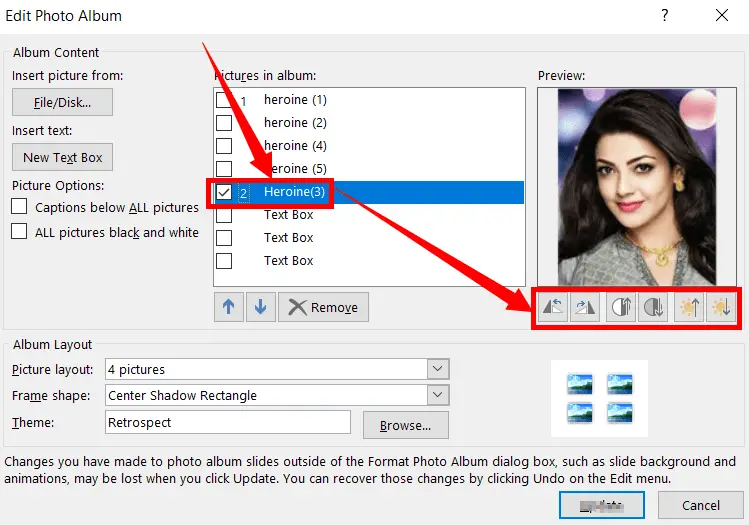
To change the brightness, and/or contrast of a picture after tick marking the check box of any picture you want, use the related buttons under the preview of the picture.
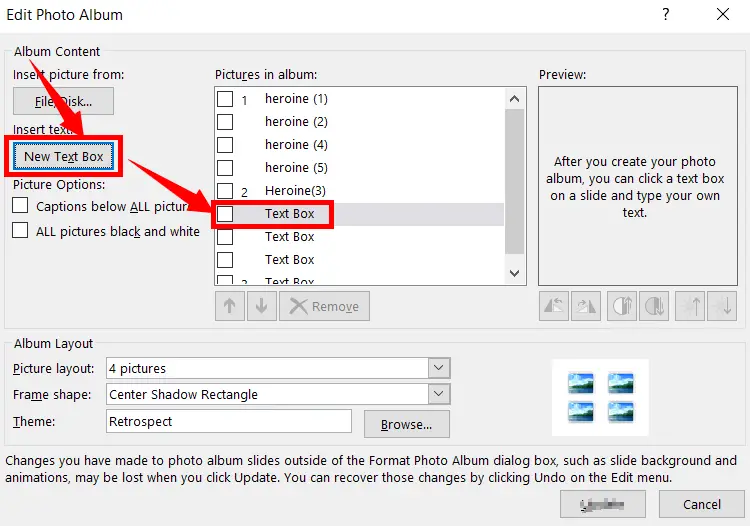
To insert the text box, select the picture in the list under which picture you want to insert, then click “New Text Box”.
Insert Text:
Insert text in the slides of a photo album, by inserting the text box as in the picture above.
Picture Options:
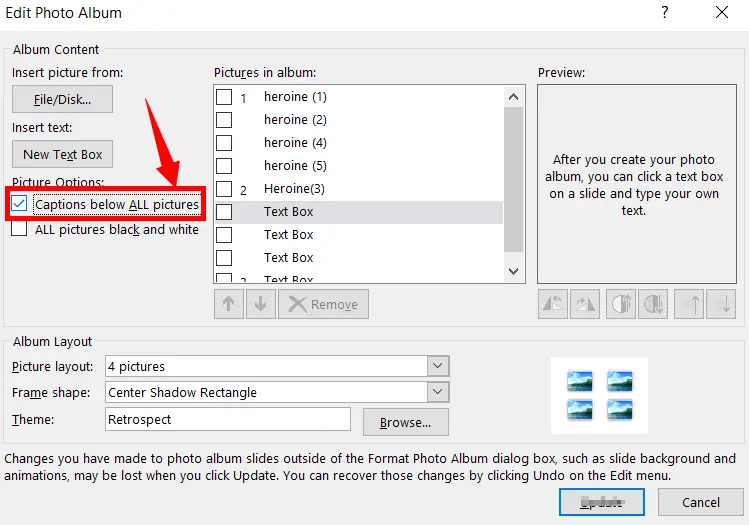
Captions Below All Pictures:
Add captions below every picture in all slides of your album. The picture name is updated as to its caption when you create a photo album.
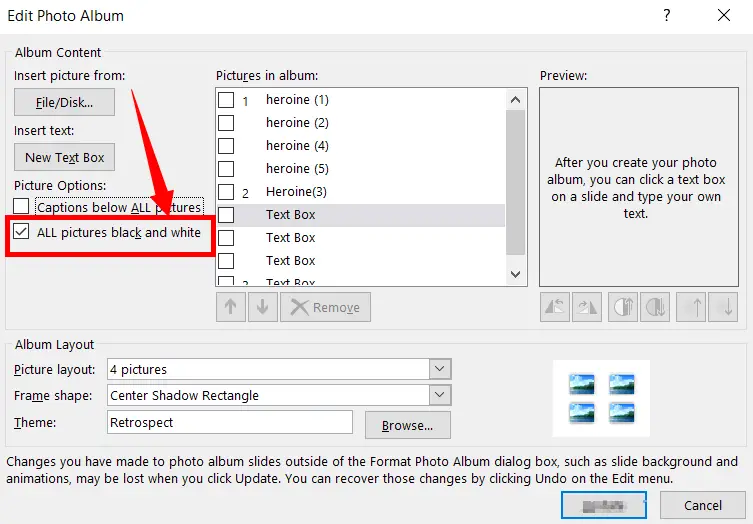
All Pictures are Black and White:
Set all pictures in black and white by selecting the tick marking “All pictures black and white” option.
Album Layout:
Under the album layout, we have 1. Picture Layout, 2. Frame Shape, 3. Theme.
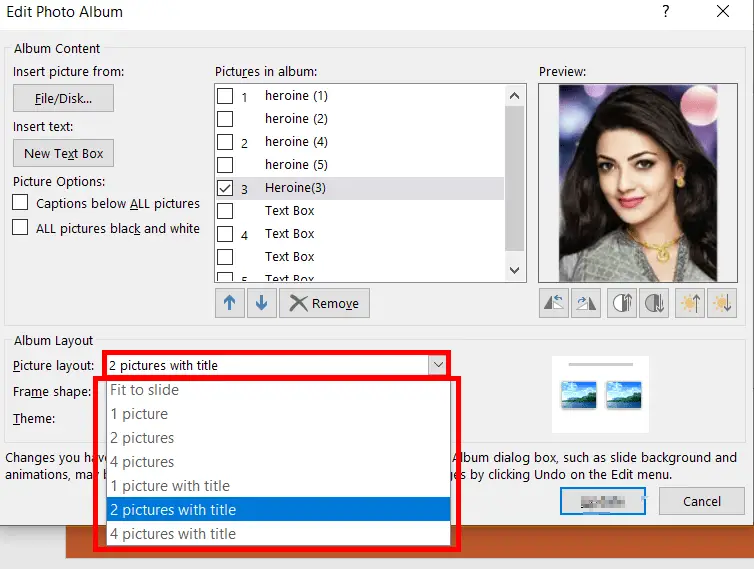
Picture Layout:
When you select any picture layout options, you can see a preview to its right.
Fit to Slide:
It is a default option. And it is used to fit a picture based on its height and/or width in a slide.
1 Picture:
1 Picture layout option is used to fit one picture in the slide after creating an album.
2 Pictures:
The 2 Pictures layout option is useful for fitting 2 pictures in the slide after creating an album.
4 Pictures:
The 4 Pictures layout option is used to fit 4 pictures in the slide after creating an album.
1, 2, 3, and 4 Picture With Title:
1, 2, 3, and 4 Picture with a title layout option is used to fit 1, 2, 3, and 4 pictures with their title in the slide after creating an album.
Frame Shape:
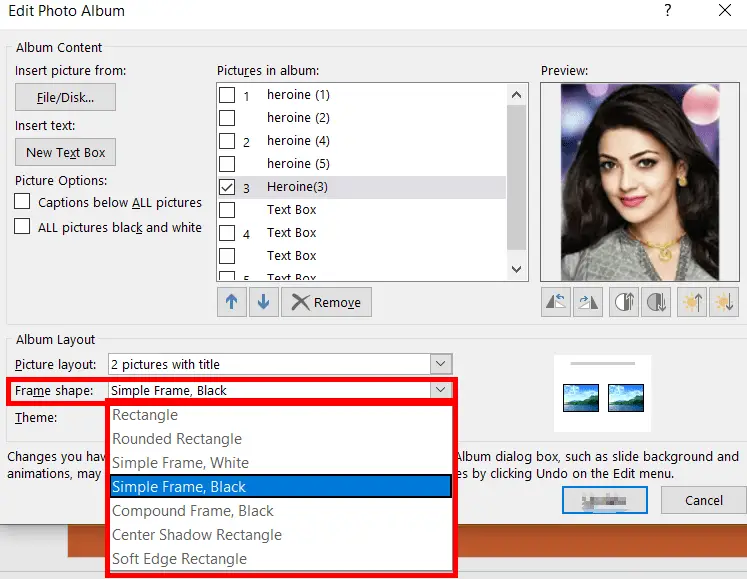
The frame shape is used to change the frame or edge of any picture. Frame shape options don’t act until any picture layout option is selected, except the Fit to Slide option (default option). When you select any frame shape option, you can see a preview to its right.
Rectangle:
A rectangle is the default frame shape of any picture. If you don’t want to change any frame shape, keep it as it is.
Rounded Rectangle:
Rounding the 4 corners of a frame of a rectangular picture here is called a rounded rectangle.
Simple Frame, White:
It is used to change the rectangle of a picture with a white border.
Compound Frame, Black:
It is used to change the rectangle of a picture with a black border by giving white space around the picture and under the black border.
Center Shadow Rectangle:
It is used to give a shadow effect to the frame of a picture.
Soft Edge Rectangle:
It is used to sharpen the edge of a picture.
Theme:
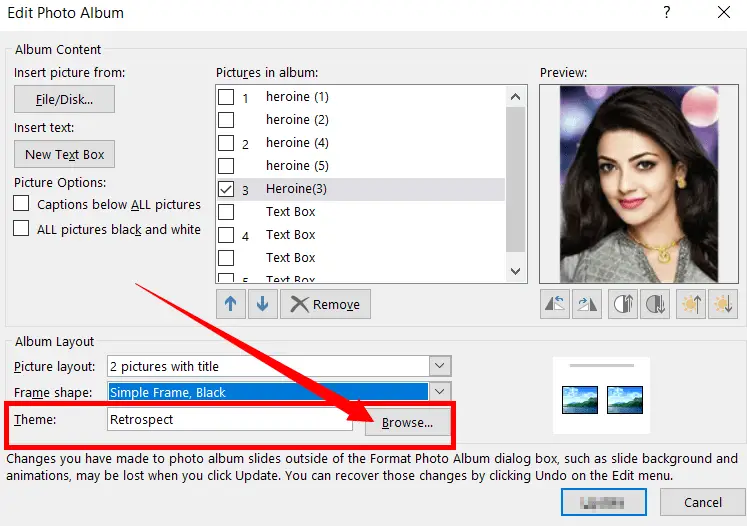
Apply different theme effects to the slides of a picture you like. To do so, click “Browse” (automatically a theme file location opens. No need to download themes additionally. It was located in your computer after installing the MS Office application), then select any theme you want to apply.
You can also apply design and transitions to create a photo album for super effects.
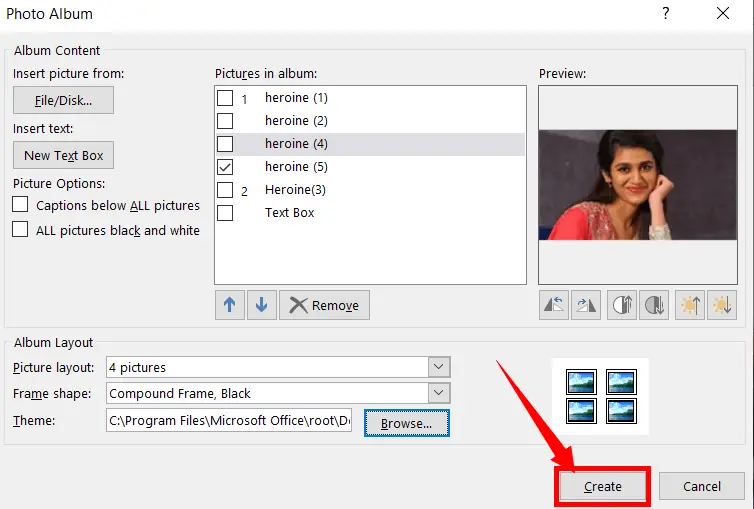
After doing all the steps explained above, click Create to create a photo album.
Can we create a photo album in PPT?
Yes, you can create a photo album in PowerPoint for your beautiful and favourite photo collections and present it to your loved ones.
Can I add captions to the photos in my PowerPoint photo album?
Yes, you can add captions to your photos in the PowerPoint photo album by editing the text boxes associated with each picture.
Is it possible to apply a theme or style to my PowerPoint photo album?
Yes, you can apply a theme or style to your PowerPoint photo album by going to the “Design” tab and selecting a predefined theme or customizing one.
How can I share my PowerPoint photo album with others?
You can share your PowerPoint photo album by saving it as a PowerPoint presentation (.pptx) or exporting it as a PDF or image files to easily distribute it to others.
Can I add music or audio to my PowerPoint photo album?
Yes, you can add music or audio to your PowerPoint photo album by going to the “Insert” tab, selecting “Audio,” and choosing the audio file you want to include.